  |
||
 |
 |
 |
 |
 |
||
| reference articles | competition journal | piping links | FAQ | contact me |
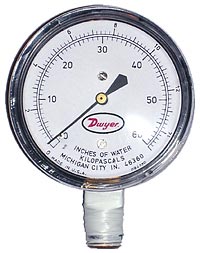
Andrew's Tips: Making a Water ManometerBy Andrew T. Lenz, Jr., Santa Cruz, California, ©2001-2013 A manometer can be a helpful device for making inconsistencies in bagpipe blowing pressure apparent and can also give an impartial accessment of reed strength. A manometer measures pressure in terms of inches. A very steady blower will show less than an inch of pressure change. An unsteady blower may show a variation of eight inches or possibly a lot more.
A "dial manometer" sells for around $40, is very portable, plugs right into your drone top and runs no risk of spills. But in order to see it you must play in front of a mirror or run the dial manometer out onto the end of a hose. (Though some have been configured to snap into a customized drone stock or blowpipe.) A homemade tube-style "Water Manometer" is not as portable, but is inexpensive ($3-$20), extremely accurate and gives large dynamic visual feedback. This page gives instructions for creating your own home water manometer. The Goal
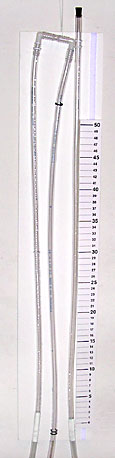
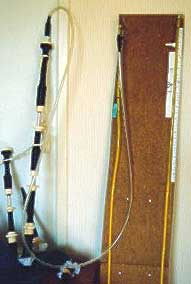
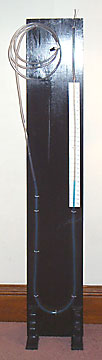
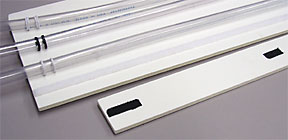
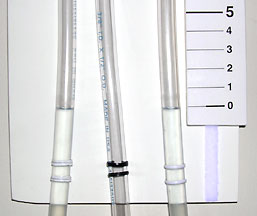
Materials RequiredImportant: Before running out and buying anything, read the instructions completely as there are a number of options. • One board 3 feet to 8 feet high by 6" to 12" wide. AssemblyAttaching the hose to the board. Run the hose from the right top corner of the board, down the edge, along the bottom, and up the left side. (Of course, you can reverse the orientation if you need the "travelling" part of the hose to the right of the board for some reason.) Affix the hose to the board in some manner: electrical staples or fasteners designed for wire or tubing. Hot glue has the advantage of not obscuring any portion of the hose, but is not adjustable and some people have trouble getting the hose to stick. If you opt for mechanical fasteners of some kind—which allow for repositioning—avoid using them near the measuring scale where they can block the view of the water level. You should now have a "U" shaped hose fixed to the board with a long length of the hose free at one end. The length for the bottom portion of the "U" which will be filled with water is not critical, but should be at least 20 inches down—and 20 inches up!—and preferably 25-30 inches or more. You'll want it to hold enough water to have some left on the bagpipe side of the tubing when have your pipes at full pressure. If you find that the hose is kinking at the top left, cut the hose and add one or two 90-degree elbow couplings. Note: The printing on most clear tubing can be removed with acetone. I removed the text on my manometer only in the section used for measuring. Adding a ruler/scale. If permanently attaching your ruler to the board, position it next to the hose so that the range 12" - 20" inches (meaning 24 to 40 inches of water) is around eye level. Or if you have a shorter board and are going for permanent scale marked right onto the board or the tubing—a little riskier—mark it similarly. (See "Ruler vs. Markings discussion below.)
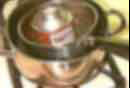
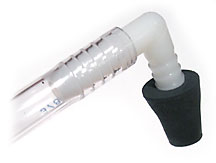
Interfacing with Drone. You need to attach the free end of the hose to the top of your drone. One piper, Bill Carr, used an old blowstick mouthpiece and just thickened it with electrical tape to make it fit. Since a mouthpiece is tapered this is handy if you need to connect with various size drone openings. Another advantage of the mouthpiece method is it is less likely to simply torque out of the drone hole. Sometimes you can purchase tubing that fits snugly into drone opening without modification. Or you can drill a hole in a rubber stopper (intended for the top of your drone) and fit it with a 90 degree elbow coupling to which you attach the hose. In any case, a 90 degree elbow—even if your tubing fits snugly—is a good idea to avoid kinks in the hose. You can even use two of these elbows to create an upside-down "U" to plug into the drone top, which has even less chance of kinking, just use a 2"-4" piece of tubing between the two couplers.
Adding Water. Using a funnel partially fill the hose. If desired, add a small amount of food coloring at this point. (If you are using the manometer over a carpet or other stainable surface, you may wish to skip the food coloring.) Fill with water to the level of the bottom of the ruler. Fine water level adjustments can be made with a dropper if you have a fixed position measuring scale. Testing. Now test it by blowing into the free end of the hose (your drone coupling). The water level rises and you can read it off the ruler as "Inches of Water." If you are using a ruler, you must multiply the reading by 2 to get the correct figure. So 15" on the ruler equates to 30 inches of water. Using. Now you can plug your tubing into one of your drone tops—no need to remove your drone reed. (The other end of the tubing is left open unless you wish to change the sensitivity—see "Fine adjustments" below.) Strike in your pipes and see what the water does. Once the pipes settle in, an unsteady blower should see at least an inch of movement in the water level—probably a lot more! Fine adjustments. The water will tend to oscillate even after pressure has stabilized due to the momentum of the water. So you may wish to add a cotton ball (or a plug with a medium-sized hole) at the scale end of the tubing as a dampener. Vary the amount of cotton (or size of hole) to fine tune the dampening effect. If your blowing is very steady, you should remove any dampening device to get the full—however minute—effect of oscillations. Scale: Ruler vs. Markings
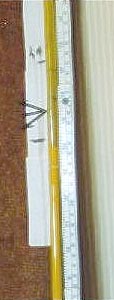
For my manometer, I made up my own scale where each half-inch is indicated an inch of water. Why every half inch? With a water manometer, you have to double the indicated number because the true reading is the difference between the water levels on the left and right sides of the "U" shape. The right goes up 15 inches, the left goes down 15 inches yielding a total 30 inch difference, the true reading. The big advantage with your own custom markings is that you don't have to make the step each time of doubling the ruler's number. In any case, you don't need a huge length of markings, you'll find most piping is done in the range of 20-40 inches. Divide that by two and you get yourself back to well within the range of a 24" ruler. Remember your manometer is only as accurate as your "0" measurement. If the water evaporates, it must be filled back to the proper level, or you'll need to move your measuring scale/ruler to match the new water level.
Measuring Reed StrengthTake your reading while holding a steady High-A on your chanter. (Theoretically you should be playing all the notes at the same pressure, but it's not uncommon for people to blow harder on High-A.) There's a bit of disagreement was to what constitutes these categories (-4/+4), but here's a guide. Easy reeds: less than 28 inches Most pipers would be in the 26 - 34 range. 1 inch water = .036 p.s.i. (pounds per square inch). So a 40" (hard reed) reading means the piper is blowing 1.44 p.s.i.—gives you a bit more respect for those 120 p.s.i. compressors, doesn't it? Common MisconceptionsSome people confuse pressure (inches of water) and volume flow (cubic feet per minute, or CFM). A manometer doesn't measure CFM; it won't tell you how much air your pipes require on an ongoing basis. The chanter reed determines the pressure (inches of water) for the whole bagpipe when it is played. Most pipers don't care at what exact pressure the drones perform, since that is mostly irrelevant, at least in terms of manometer readings. Most pipers either block a single drone with the manometer fitting or have a specialized (commercial) stock on their pipes to which a manometer attaches—in that case, no sound openings are blocked. Regardless of a drone blocked (or all blocked or none blocked), the chanter will still play (sound) at the same pressure and read the same on a manometer. General AdviceManometers is far more common in North America than in Scotland. When talking to one world-class Scottish piper, he didn't know what a manometer was. Another knew of them but disliked them. A manometer is not a replacement for an instructor. Nor is it a replacement for developing an ear for variations in pressure or quality of tone. A pipe that is in tune and blown steadily may still have a chanter reed that is thin and has poor tonal qualities. One thing you can do to develop steady blowing is occasionally plug your chanter and simply play your drones and listen for a solid tone. Recording yourself while doing so can also be helpful. Bottom line? A manometer is a tool. It's simply another item in your toolbox when building a better piper. Is it a required tool? No, you can become a great piper without one. Can it be useful in some circumstances? Yes. But remember that the number one tool in your toolbox should always be a good instructor. Other ResourcesI've gotten a number of questions asking about the volume of air used in playing a bagpipe. Back in 2004, a few students at Carnegie Mellon University (Ben Brown, Garth Zeglin, and Roger Dannenberg), build a robotic bagpipe player called McBlare. In their research, they found the air flow requirement of bagpipes to be between 1.6 and 2.5 cubic feet per minute, CFM (0.045 and 0.07 cubic meters per minute, CMM). You can download detailed information about McBlare from the Proceedings of the 2005 International Conference on New Interfaces for Musical Expression (NIME05), Vancouver, BC, Canada: Brett Tidswell has an article on how to construct a manometer using a blood pressure gauge (PDF) which may also be of interest.
Thanks to Bill Carr for providing photos of his manometer and a basis from which this page grew. If this page was useful to you (or you have comments), please contact me so I know and I'll be inspired post more pages. This page last updated Sunday, February 17, 2013. |

| sitemap | ||

