  |
||
 |
 |
 |
 |
 |
||
| reference articles | competition journal | piping links | FAQ | contact me |
Andrew's Tips: Carving Bagpipe ChantersBy Andrew T. Lenz, Jr., Santa Cruz, California, ©2005-2010 This page explains the methods of modifying a bagpipe chanter to correct the pitch of problematic notes.
Much like altering reeds, carving chanters can be a controversial subject. Some pipers strongly recommend against carving chanters saying that one should rather correct a problem note by tweaking a $5-$10 chanter reed than a $200-$300 chanter. And resale value on chanters is much higher if they are uncarved. Yet, if you were to inspect chanters in a Grade I pipe band, you'll likely find over half the notes changed from their original factory specifications. To them a chanter is practically disposable, precise tone is absolute king. Old museum piece chanters show indications of carving—it's nothing new. Is it really worth suffering for years with a less than optimal sound to get that extra $50-$100 should you ever sell your chanter? Carving of a chanter hole is done to achieve one of two results. Raise the pitch of a flat note or increase the volume of a note. The former is much more common than the latter. Increasing volume usually involves carving a series of notes in a band situation and is less typical for a solo piper. Practically every advanced piper is going to warn a beginner or a less-experienced piper with an unrefined ear against carving their own chanter. Often it can be a slippery slope of unintended cause and effect. Chanter carving is best left to experienced pipers or to the maker of the chanter. One important note. If the chanter you are considering carving is on loan—that is, from a band or friend—talk to the owner first. Pipe majors have been known to get quite irritated with band members who take it upon themselves to "improve" a band chanter! Determining if carving is necessary.You should also know that the environment for which the chanter was tested in all likelihood doesn't match that of your surroundings. Temperature, humidity, altitude all affect the performance of a chanter. There's no way for a pipemaker to create a chanter that's going to be perfect in all climates and all playing regimes. Also, manufacturers of chanters are not always perfect. While not particularly common, it's known that a few makes and vintages of chanters have had inherent problems with the placement of specific holes. If you are concerned, you can check with the maker (if they are willing to admit to such an error). Or check with a dealer for that particular brand of chanter. Or find a high-graded competition band that uses that chanter—such information may be obtained from the maker: "Gee, what top bands are playing your chanters?"—and ask the band about modifications they've consistently made to the chanter. (Keep in mind that a band may be using different reeds or, even if the same reeds, a very different pitch setting than you.) Try a variety of brands of chanter reeds. Chanters are often made to match a particular brand of chanter reed, others are tested with a variety of available reeds. You don't want to carve your chanter to match a reed only to find that your chanter is significantly off for your next reed. Make sure that whatever note is suspect is consistently a problem and not just a reed-specific issue. Some pipers on the verge of carving have discovered the perfect brand (or brands) of reeds that not only did not require chanter carving, but were such a perfect match for the chanter that they didn't even require any tape on the holes! Another thing to try before carving your chanter is to make sure it's clean. Sometimes residue will accumulate in the finger holes or grime will collect in the bore. It could have been from dirty fingers or just dust settling and sticking to condensation in the chanter. Give it a good inspection using a strong light source and, when in doubt, get in there and clean it. Alternatives to carving.If your chanter reed is set where you want it—either your chanter is in balance (high-A and low-A match), or it's set to band pitch—and you are finding that certain notes are flat, other than attempting to tweak the chanter reed (see Modifying Bagpipe Chanter Reeds) or carving those problematic notes, the only real solution is to sink the reed into its seat until the flattest note is correctly pitched then tape the now overly sharp remaining notes. The disadvantage of this is that you are taping over a lot of the holes significantly and weakening the volume of the chanter. One alternative is to carving up a chanter that isn't meeting your demands is to simply acquire a different chanter. Aside from designing chanters for a particular brand of reeds, chanter makers also target a specific range of pitch. If it's designed to pitch around 462 Hz for low-A—like some decades old chanters—it's not going to be very happy if you are trying to get it to perform properly at 478 Hz.
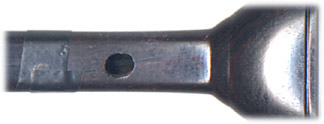
Another alternative to you carving a chanter is to have someone else do it for you. You can just send it back to the manufacturer for adjustment. Some pipers—some through piping retailers—offer chanter adjustment as a service. Personally, I'd want to make sure that the piper is a professional grade piper—if he or she is a world class piper, all the better. What to carve.The mostly likely candidates for carving are high-A and B, though others may require adjustment. If you are considering carving low-A, be positive it's the problem since this will alter the fundamental "tonic note" of the chanter. Changing the low-A will also slightly affect B, E, F, high-G and high-A in decreasing amounts as you go up the scale—such a change would be infinitesimal with regard to its effect by the time you reach high-A. Low-A modification is sometimes necessary, but best done by very experienced hands. Conversely, the higher the changed note, the less effect on the rest of the chanter and less risk. How to carve.Pick your target(s). First, draw yourself a diagram of which note (or notes) that are giving you problems. It's not all the hard to get distracted by the process and forget which hole you are supposed to be working on—much like the stories of dentists pulling the wrong tooth! Mark the flattest note and begin with that note. If you wish, you can even mark the chanter itself with a watersoluable pencil such as a "China Marker." Tools. Pipers use a variety of tools for opening holes. The most common are precise instruments such as small rat-tail files and deburring tools. A few brave and very experienced pipers use motorized tools with rotating sanding bits (such as a Dremel). The high-A hole shown in the photo at the top of this page was treated with a Dremel by a Gold Medalist. Such motorized tools are recommended only for those that have a preconceived idea as the amount of wood removal required as these tools can take off a lot of material in a very short time. It's easy to destroy a nice chanter with any motorized tool, that's why most people don't use them. If you would like some practice undercutting, you can drill some holes in a piece of PVC pipe to simulate chanter holes and use it as a "guinea pig." Carving a plastic chanter has a different feel than wood, but the concept is the same. Testing. Understandably, it's not easy to reverse, so you'll want to carve slowly and sparingly and test often against a tenor drone (some prefer the middle tenor). It's best to not to try to carve your chanter when you don't have a lot of time for adjusting and testing. Make sure you blow very steady when testing. A manometer could be helpful to monitor your blowing pressure. Playing short bits of tunes can be helpful in determining whether you have successfully corrected a note or not. If you get to the point where you can't tell, I'd recommend stopping and perhaps doing additional work another day. Be patient! Do it. Start by fully inspecting the hole you are going to carve. Check for cracks, pits or any other irregularities and adjust your approach accordingly. (Figure 1.)
Begin your adjustment by carefully undercutting the top of the hole. (Figure 2.)
When undercutting beware leaving too thin of an edge at the note opening. Thin edges may snap off, crack, or find themselves stuck to removed tuning tape! (Figure 3.)
If the minor undercutting doesn't provide the pitch you are looking to achieve, you can either undercut some more—not too sharply—or start to make the hole opening a bit oval shaped. (Figure 4.)
If you still don't have the note corrected, more cutting/filing/shaving may be necessary. (Figure 5.) Once the hole wall has become a right angle again, you can once again undercut the hole if yet more correction is required.
Remember, your fingers have to seal those holes you are enlarging. If they get too big, the usefulness of the chanter will be seriously compromised. In addition to not being able to close the hole, the note itself may lose stability and squeal or change pitch unexpectedly. That said, it wouldn't be extremely unusual to see 1/16" (2.5mm) carved away from the top of a chanter hole. On the other hand, in most cases, undercutting will suffice for correcting a troublesome hole. Try to keep your carving or filing clean and even with no rough edges and no sharp changes in angle. Drat! The hole's too big.Whether you inherited an overcarved chanter or did it yourself, there are some methods of somewhat reversing the situation. One very old method is to apply beeswax (or a mixture of beeswax and rosin) to the top edge of the hole. The problem is wax is relatively soft and gets softer with warmth from your hands or heat from sunlight. Definitely a temporary fix. You can also simply tape a hole that's too big, but it's not permanent. And it still acts as an undercut hole—you're not surprised I hope!—so it's not as effective as building up the wall of the hole. A method used by some pipers is to apply thin gradual layers of white glue to build up the wall of the hole. This is more effective and more permanent than tape or wax. Be aware that white glue will soften with prolonged exposure to moisture—such as sweat or condensation—but a good patch if you want removability. Yet another method is to apply wood putty. Or resin. Or a mixture of epoxy or super glue with blackwood dust. Any of these may require redrilling or sanding to return the hole to the correct size. These methods are a bit more permanent and are perhaps best left to a pipe maker. There's always the risk of any repair popping off the oily wood of the chanter. This can be reduced by roughening up the wood slightly before applying any concoction. Closing.Like anything, practice will give you confidence and experience. Could it be that you'll mess up an expensive chanter? Sure. Or you might take a chanter that's hindering your performances and turn it into something that's a friend instead of a foe. Who knows, you might just get to be like professional piper Mark Saul who I once watched intrepidly carve his Low-G vents—borrowing my very sharp pocket knife—in less than five minutes.
If you have any comments about this page please contact me. This page last updated Sunday, March 14, 2010. |
| sitemap | ||

