  |
||
 |
 |
 |
 |
 |
||
| reference articles | competition journal | piping links | FAQ | contact me |
Andrew's Tips: Learning to March with BagpipesBy Andrew T. Lenz, Jr., Santa Cruz, California, ©2009-2010
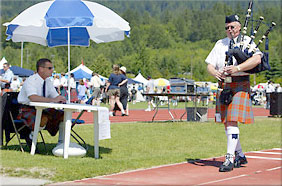
Your pipe major decides you are ready to join the band on parade. Or you have reached the level in solo competition where you are required to march for your march events. You have one small problem. You don't know how to march. Have you ever been walking down the street while stray music is permeating the air and you realize that you are walking in time to the music? If you look around, you're likely to find that many other people are doing the same thing. Walking to a beat is an unconscious and natural human characteristic. That's good news because bagpipe marching is simply walking in time with the music. The bad news is that if you think about it too much you can and will mess up. You can't successfully focus on playing music and micromanage your feet at the same time; since your feet are a lot easier to forget, that's what you are going to want to do! What follows are some suggestions on how to learn to march. It's probably worth a mention that there are a number of approaches to teach and grasp marching. You may find some steps in the process really easy (or you may be already doing) and move quickly onto another. Some instructors might skip around from the order of the suggestions below when teaching their students, though certain skills will typically always happen before others, such as marching in place with a practice chanter before marching back and forth with the full set of bagpipes. I'm going to be referring to 2/4 marches, but the basic principles apply to 6/8 (treated as having two beats in a bar) and 4/4 marches (four beats in a bar) as well. I'm going to assume below that you have and know how to play along with a modern electronic metronome. If you have trouble with a chosen tempo, you might consider slowing the tempo a little bit. Or you might focus on the flashing light instead of the audible click. It's important to know that trying to march to tunes that you don't have down cold will be very difficult. It's best to work your way into marching using tunes that you could almost play in your sleep. In other words, don't try to learn a new tune and marching at the same time. GETTING THE BEAT WITH YOUR FEETIgnore any tunes for the moment. Start by sitting at a table facing your metronome and set it to around 50 beats per minute (BPM)—--if you find that too slow or too fast, feel free to adjust it a bit. Put your hands in your lap or on the table; they'll be ignored for the time being. Alternating your feet, at the last instant lift your foot fully off the ground and back down in time to match the click of the metronome. Be relaxed and don't use jerky motions. If you can, practice this on a hard surface where you can hear your foot taps easily. (Slippers on a carpet is not as helpful!) Most people find this pretty easy. Once you are comfortable with "seated marching," repeat the exercise standing, by simply marching in place to the metronome. Leave your feet on the ground, lifting your foot for the minimum time necessary for your foot to return to the floor right on the beat. Don't lift your feet too high. If you were to look down while marching in place, you shouldn't see your knees extend much past the end of your toes. It's only a little lifting of your feet. And don't stomp; you aren't squashing grapes---think "walking." If you have access to a video recorder, record and analyze your in-place marching. A video can be very enlightening by helping you be an objective observer to your own progress. What can also be helpful is to go for a walk with your metronome. Most metronomes have an output jack for a earpiece or earbuds. Make sure your feet contact the ground on each metronome click. Once that becomes automatic, you can add a level of complexity by also humming a march tune or singing one in your head, making sure to keep your feet hitting the ground on the beat. Once you've mastered the above, try marching in place to a recording of a 2/4 march. Again, listen carefully and video record yourself if you can. Repeatedly go for walks with your recordings of 2/4 marches, walking to the beat, being aware of your footfalls. FINGERS AND MARCHINGNow get your practice chanter out. Repeat the seated alternating feet exercise but this time in addition play a constant Low-A with a High-G grace note on each beat. If you can, record this exercise then play it back and check for any discrepancies between the metronome, your G grace notes, and the taps of your feet. The above is followed by standing and marching in place playing G grace notes on Low A in time with the metronome. The next stage is to repeat the above marching back and forth or in a circle rather than just in place. Next move onto the pipes. Simply play Low-A and play G grace notes while marching in place to the beats of the metronome. You can either watch the flashing light or put in an earpiece or put on headphones to hear the click. Again, don't lift your feet for too long, they should only be off the ground long enough to comfortably tap out the beat. Your feet should be on the ground longer than they are in the air, unless you are actually moving forward---even then it's still a bit less than 50% of the time in the air for each foot. But remember, it's a natural walking motion. PLAYING A TUNE AND MARCHING WITH A PRACTICE CHANTER AND BAGPIPESBack to the table. Let's march while seated at the table and play your march tune on your practice chanter. Mark out the beats on your copy of the sheet music with "L" "R" "L" "R" and play very slowly so you can read the music and make sure that you are marching out the beats with alternating feet. As tempting as it is to jump right to the pipes, most have an easier time by initially combining marching and playing using a practice chanter. However, when taking a breath, keep fingering the tune on your practice chanter and when you start blowing again, continue where your fingers are in the tune. Don't let your breathing interfere with the beat and your marching. (Obviously, if you can circular breathe, this is not a concern.) Once you have marching with a practice chanter accomplished, move onto the full set of pipes and practice, practice, practice until you have it down. If you have trouble, it may be helpful to go back and repeat earlier steps in the process. PLAYING A TUNE FOR COMPETITIONYou should begin so your left foot hits the ground on the first beat in the first bar of the music. For any pick-up notes, your left foot will be in the air preparing to hit the ground for the first beat. Now, there can be a bit of variation in this. Some pipers swear that you should march a bar or two or three in place before stepping out. Others recommend playing a few bars then to start marching in place and stepping out once you feel everything is under control. Yet others may step out with the left foot on the first beat of the tune. It depends on what works for you. If one method continues to fail, try another. In solo competition, a lot of pipers have success with 2/4 marches by marching forward for 4 bars, turning for 4 bars, marching forward for 4 bars, turning for 4 bars. Others don't bother being so exacting, but the advantage "march 4, turn 4" method is that you will know where you are in the tune by your physical location relative to the judge. If you start to the left of the table and forget where you are in the tune but you are now turning at the right side, you know that you have yet to play the repeat of that part. This is known as the "LLRR" method: "Lead Left, Repeat Right." If you have a short platform to perform in, you may find it's more like "march 3, turn 5" but the key is to step off in marching at the start of each new part. Your forward motion steps should be shorter than longer and at most a casual walking stride. Four bars of marching forward is 8 steps, so if those steps are too long, you could end up at another judge's platform by the time you need to make your turn! Also, take your time making your turn. You have 4 bars, so make small angle changes with each step. Practice this by marching back and forth to a recorded march, then try marching while playing yourself. After you've got a good handle on marching and playing on the full set of bagpipes and know the approach you are going to take, get yourself a folding card table and set it up as a judge's table, then practice marching back and forth in front of it. If you can get someone to sit at that table and listen who knows something about piping and can jot down your mistakes—I mean, helpful comments—do that as well. And don't forget your video camera. Sometimes you'll hear pipers swear that you should never turn away from the judge while competing, that is, when executing your turns always turn toward the judge---clockwise at one end, counter-clockwise at the other. This is a nice courtesy to the judge. The safe way to make sure to placate the very few judges who seem to care is to march a figure-8 pattern, always turning toward the judge. If always turning toward the judges throws you off, don't do it. (Personally, I don't worry about turning in a direction away from the judge; I believe it's an overrated concern. Most judges are more concerned about the music you create. On the other hand, if you ever take part in a stage performance, always turn toward the audience, they'll appreciate that.) End facing the judge as close to the center as possible, if you can do it without overtaxing yourself. The tune comes first, so again, if ending in the middle facing the judge will mess you up, don't do it. An objective is to not think about marching. You should get to the point where it's automatic. If you start thinking about it, you'll be more likely to bungle your marching. Rather like when you start thinking about individual notes in a tune instead of just playing the tune as a melody. Micromanaging yourself is asking for trouble. Once you have the marching figured out, you have to learn to trust your feet and forget about them. You can only concentrate on one thing at a time, and you want that one thing to be the expression in your playing. Speaking of expression, in playing a 2/4 march, the emphasis is always on the first beat in the bar. One method of stressing this emphasis is to march wearing a shoe only on your right foot. You hold the beat slightly on the "deeper" foot to make it strong and that will help your expression. Sometimes you hear instructors recommending wearing a shoe only one the left foot. Again, find and use what works for you. If you get the opportunity to watch more advanced pipers marching in competition, watch them closely. If you don't, you can typically find videos of marching competing pipers on YouTube.com. One of the better examples is one of Andrew Lee at Winter Storm in 2009 (we're after the march, the first tune in this MSR performance): Don't expect to learn to march overnight. Everyone is different, but plan to give yourself at least a few weeks, though it could be much longer. As you practice it, the time will come when you'll look back and wonder why it was so hard! BAND MARCHINGWhen marching in a band, one big thing is to keep aware of your position in the group: directly behind the person in front of you (if you are in the front row as an inexperienced marcher, your pipe major is nuts or desperate), and typically a band "dresses right"; that is, you make sure you are in a straight row with the person to your right. It's the responsibility of the person on your left to dress to you, not you to him. If he strays ahead, don't try to even out the row, you'll end up bunched up with the row ahead of you, so continue to "dress right." That piper on your left needs to learn to correctly dress to you and back off a bit from the preceding row. The distance between rows and between columns is up to the administration of each band. The typical tendency of people is to gradually bunch up into a tight group while marching---safety in numbers, I suppose! Whatever distance is decided, keep it in the back of your mind and stick to it. You may want to practice switching feet for the instance that you find you are marching on the wrong foot. You may also practice altering your stride length while keeping the beat should you find that you've fallen behind in the rows or you are too close to the row in front of you. Other than that, marching will be pretty easy. You'll need to master starts and stops in forward progress while still marching to the beat, but it's fairly easy to catch on to that. If you are having trouble marching while in formation, you can always convince a few band members to practice with you in a parking lot or an empty gymnasium outside of regular band practice time. Have one in front and one to your right, and ideally, a drummer behind. If you are in a competition band, they'll show you counter-marching and marching in and out of a competition circle, so I'm not covering that here. Again, if you have trouble learning to march, just give it time and continue to practice. Eventually, it will become second nature and you'll barely give it a thought.
If you have comments or suggestions about this page, please contact me. This page last updated Sunday, March 14, 2010. |
| sitemap | ||

