Andrew's Tips: Tying/Making Bagpipe Drone Cords
By Andrew T. Lenz, Jr., Santa Cruz, California, ©2003-2010
Bagpipe drone cords are one of those unexciting but essential things to a set of pipes. This page will explain how to tie drone cords correctly and also how to make your own set of drone cords if you'd like. Please read the whole page before you leap into tying your drone cords.
 |
The basics.
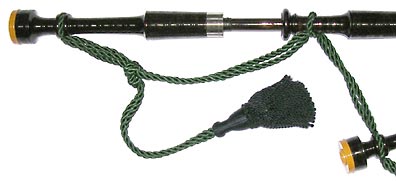
Drones are held by twin large, long cords that are joined together at each end by a tassel. The drone cords are secured in four places: outside tenor drone top to the middle tenor drone top to the middle section of the bass drone, to the top of the bass drone. (Not counting the final knot of the cording itself at the bass drone.) Drone cords are traditionally made of wool or silk but can now be found of other materials, including polyester. These cords are available in a range of colors.
|
How to position and secure drone cords.
What to use. These days there are two common means of keeping the drones in position along the cords. First is by thread, or hemp cord*. Second is by plastic cable ties. Many brands of pipes are now shipped with the cable ties as they are very quick to install. I, personally, don't like the appearance of cable ties as seems incongruous to a ancient instrument, but they do lock in place quite well, seldom slipping when installed tightly. Thread/hemp is the traditional method, is usually less conspicuous but over the course of months or years can work loose more easily, unless sewn through the cording. Cable ties have to be removed by cutting with a sharp knife or snipping with thin shears, while thread/hemp can be partially cut then unwound which is typically less risky to the cords.
*While it's conventionally called hemp—e.g., yellow hemp, black waxed hemp—there's no hemp in modern bagpiping cord.
Since cable ties and thread come in some different colors, I'd recommend matching the cord color as best you can. If you have dark cords, go with as dark or darker ties. If you have light cords, go with as light or lighter ties. Thread is easy to match. Hemp you will find usually either in black or yellow.
Another less common method of securing drone cords is rubber O-rings, which can be purchased at most hardware stores. (These will be practically impossible to install if your tassels are permanently affixed to the end of your cords.) The advantage of O-rings is that changing cords becomes quite easy. Simply roll the O-rings away from the drones and slip off the cords.
A variation on the hemp/thread method is—after positioning has been determined—to sew/tie one side permanently together but for the other side of the drone secure it temporarily by sewing snaps or a hook/eye combination. To remove the cords, unsnap or unhook.
Yet another method is to use wire twisty-ties like those used to seal plastic bags or secure computer cables.
Positioning. There's a few different schools of thought on the spacing between the drones. There are those that say it should be approximately 7" (18cm) between bass and middle tenor and 5" (13cm) between center tenor and outer tenor. Another says seven inches center to center. Some recommend simply using the length of a dollar bill to determine the spacing. These methods make no allowance for differences in stature of the piper. Another school says to use your hands for determining distance, i.e. full hand span (thumb tip to pinky tip) between bass and tenor centers, and span with thumb in (side of thumb to pinky tip) for tenor to tenor centers.
However you determine the measurements, the bottom line is that it should be comfortable for you. If it's not, change it. (See "Adjusting" below.)
The drones will sit between the two parallel cords. Once you have placed the cords on either side of the cord channel on the drone top and level to the middle bass drone section, you are ready to secure.
Securing. I recommend that you start with the outside tenor. The idea with the length of the cords is that while holding the pipes at your side by the bottom section of the bass drone, arm hanging down, drones spread as far as the joining cording allows is that the tassel should not drag on the ground. For an average size male, the measurement from tenor drone to end of tassel should be around 14" (give or take an inch). If you can move the tassel up later and trim the excess, you've got the luxury of erroring too long. If you tassels are permanently fixed at the ends of the cords, it's better to go too short.
One option for tying is to position the cords at a 90 degree angle from each other on the outside tenor (when looking down from the top of the drone, one facing toward the middle tenor and one facing the back), 180 degrees on the middle tenor (right and left), 90 degrees for the middle portion of the bass drone (toward the middle tenor and the other back) and for the top of the bass drone, tie them as close together as you can get, maybe half an inch apart, these will both hang toward the back of the pipes. Another other option is to simply keep them all at 180 degree angles to each other, it makes the cords a little more "loopy," but since it's tradition, it's fully acceptable. Or you can do a combination of these two options. Whatever appeals to you.
Make sure that after you've secured the cords to the middle section of the bass drone and you are about to secure the cords to the channel in the bass drone top that you leave enough slack to be able to remove your drone top! You don't want it taut, and you don't want it so loose that it droops more than 4-6 inches (10cm-15cm).
For installing cable ties, I'd recommend that initially only tightening them to the point where they are snug but moveable so that they can be repositioned during the installation process. Once you are sure of the placement, draw it as tight as you can get it. Clip one tightly on one side of the drone, pull the cords tight, slide the second tie up as close as you can to the drone then tighten it. Carefully cut off all the excess cable tie and you are done.
For thread/hemp, I'd recommend a similar approach. Position the drone in question, tie one side tight—looping thread around a dozen times or so (half that for hemp) then tying it off—then proceed to push the drone against your new knot, then tying a second knot as tight as you can get it to secure the drone in place. If you are using thread, you can actually sew directly through the cord. This will prevent the thread from slipping away from the drone and getting loose.
Tying off the bass drone. Once you've the cords all secured in place you are left with a somewhat long drone cord hanging off your bass drone top. You're going to want to tie this off a bit so it doesn't catch on things or build up momentum and swing your drone back and forth.
Now, how to do that bass drone knot. You have two portions of cord to deal with, the part that connects from the drone top to the middle drone section (A) and the tassel part (B). Take the tassel cord (B) and line it up so it's parallel to the other cord (A), i.e., the cord is doubling back on itself—so, up from the middle section, up to the groove, back down. About a quarter to a third of the way down (A), pinch the two together and loop the tassel cord (B) around the other cord (A). Once the tassel cord has passed the loop starting point, feed the tassel (and cord) down through the loop toward the bag, then pull it tight. Pretty easy.
Adjusting. If you find that the drone spacing is just not quite right, you have a couple options. The first is obvious: redo your ties. The second is not as obvious and will have a little visual impact. You can remove the drone top and rotate it around the cord (like spinning a propeller), this will twist the cords and shorten the distance between that drone and the adjacent drone. If you twist the center tenor it will shorten the distance between both the bass drone and the outside tenor—unless you had twisted some of the cording in the opposite direction previously!
If you find that in order to get the correct distances that one stretch has the cords very twisted and the other not, you might consider for the sake of esthetics redoing your tying for one drone.
The Easy Method for Quick-Change Drone Cords.
If you need or want to change your drone cords easily, a good alternative to sewing or cable ties is either snaps or a hook and eye combination—or you can read the O-ring discussion above. I'm going to only discuss snaps, but a hook and eye system will be similar.
Only move onto a snap system after you are sure of your drone positions. It takes me about 90 minutes to sew one set of drone cords with snaps. You may be faster than me, but nonetheless, it's not something that you'll want to repeat over if it's wrong. (I usually set myself down in front of a movie while sewing so I don't get completely bored!)
Resist the temptation to use tiny snaps to be inconspicuous. They won't hold, particularly between the middle tenor and the bass drone. Use snaps at least the full width of the cord diameter. You should be able to find snaps in at least black and silver and perhaps other colors. If you are very particular, you can color the snaps with thin coat of enamel paint, finger nail polish, or with an enamel paint pen often found in art supply stores.
You only need snaps on one side of each of the cord grooves as releasing one pair of snaps will allow removal of the cords from that drone. The snaps should be placed on the inside of the outside tenor, the bass drone side of the middle tenor, the middle tenor side of the bottom bass drone section, and finally, the tassel side of the cords for the top section of the bass drone. The hardest part is getting the correct placement of the snaps relative to their companion permanent wrap/stitch on the opposite side of the drone. Too loose and the cords may slip from their groove. Too tight and the snaps unexpectedly open. Once done, you can use your completed set of cords as reference for placement of snaps on other sets of cords.
You should be able to remove one set of snap drone cords and replace them with another in under one minute. I've timed it. It's very quick.
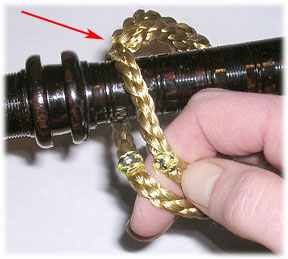 |
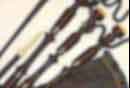
Snaps.
This photo shows drone cords unsnapped and removed from the groove of the top of the bass drone. The red arrow indicates the position of the permanent wrap/stitching used on one side of the cord groove.
|
How to make your own drone cords.
Unlike a bag cover which requires sewing, it is quite easy to make your own drone cords. I've found that making your own drone cords doesn't save you much money, the materials cost more or less the same as buying a completed set of cords, but you do get to customize the cords as far as length, type of tassels, and color combinations. And in a pinch, you can make them very quickly if commercial replacement cords aren't readily available.
Finding materials. A trip to a home decor shop or a fabric store will often provide you with the raw—if you can call them that—materials: cords and prefabricated tassels. Keep in mind that it is traditional to have the tassels the same color as the cord. (As a beginning piper, in the first set I made, my tassels matched the trim of my custom bag cover and the cord match the body of the cover—I received some strange looks at band practice.) Store bought tassles are usually a little wider and the dangling braids thicker than prefab bagpipe cords, but they don't look bad.
You will need 10-12 feet (3m-3.6m) of twisted cord. These will be doubled up to make the two parallel lengths. Or you can get several 6-7 foot (1.8m-2.1m) lengths of assorted colors if you wish to braid your cords. You will also need the two tassels.
If you are really adventurous, you can make your own tassels. A quick but not so great way to do it is to simply wrap yarn around a playing card and cut one side, then tying a loop around it about a third of the way down. The more official way to do it is somewhat complex. One website with some information on making you own tassels is MeinkeToy . .
Assembling materials. If you want to braid your cords, you'll have to look elsewhere on how to do it. (It's been recommended to investigate both lanyard weaves and linear macrame braids—of which I know nothing about.) The only advice is remember with braiding is to leave a little extra space around the drones in case you wish to remove the cords without completely unbraiding them.
From tassel top to tassel top should measure somewhere in the neighborhood of 62" (157cm). I measured three sets of commercially manufactured drone cords and the exposed cord measured 62.5" (161cm), 61.5" (156cm) and 61" (155cm) respectively. So some variation is obviously acceptable—no one's going to come up and measure your tied up drone cord!
Tassels typically have some mechanism for securing the cord inside the "bell" of the tassel, sometimes just a plastic insert with grooves to accept the cord. If you'd like, you can put the tassels on after you secure the cords to the drones, or you can lightly place the tassels, then tighten them down after you are sure of the lengths.
|
Bagpipe Maker Identification Tip
While the drones have the cords off, you can check the cord channel for a pipemaker's stamp. This inconspicuous location is sometimes chosen so the marking has no chance of harming the pipes' esthetics.
|
Additional reference.
In March of 2010 Bill Robertson made a video on drone cord tying.
If you have comments or suggestions, please contact me.
This page last updated Sunday, March 28, 2010.
Page first created in March 16, 2003.
|