  |
||
 |
 |
 |
 |
 |
||
| reference articles | competition journal | piping links | FAQ | contact me |
Andrew's Tips: Bagpipe Chanter Reed BasicsBy Andrew T. Lenz, Jr., Santa Cruz, California, ©2001 - 2012 This page is intended as a primer to the basic parts, types and use of a bagpipe chanter reed.
The Anatomy of a Reed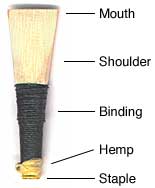
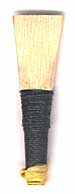
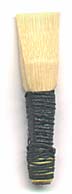
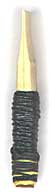
Mouth. The mouth of the reed is the opening located at the top of the reed and is formed by the two opposing pieces of cane, the "blades," sometimes also called "tongues." The very top of the cane portion of the reed is called the "lips" or "tip" of the reed. Shoulder. This is the area across the central portion of the exposed cane. On a ridge cut reed, the shoulder is fairly pronounced (see below). Binding. To hold the two pieces of cane to the staple, they are wrapped with black hemp. This is called the binding. If the binding starts coming loose, clear finger nail polish will provide for a good repair. Hemp. The hemp is not technically part of the reed itself, but facilitates positioning the reed correctly and snugly in the "reed seat" which is the hole located at the very top of the chanter. The hemp should not even partially block the hole at the base of the staple as this will affect the reed's performance. Staple. At the base of the reed is a cylindrical/conical piece of metal, typically copper or brass that provides a support for the rest of the reed. (If you are lucky, might get to see an old reed with a staple made of silver.) The staple opening is round at the bottom and elliptical at the top. The staple is a soft metal because sometimes it is desirable to alter its shape and, consequently, also the reed's sound. This alteration is accomplished with a tool known as a mandrel (see Modifying Chanter Reeds). Other terms: Sound Box/Throat/Tone Box. This is the space inside the reed that is located between the top of the binding and the shoulder. Edges. The two long sides of the blades are considered the edges. The mouth of the reed is not typically referred to as an "edge." The Two Types of Reeds
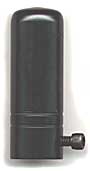
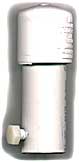
The Effect of Moisture and Pressure on Reed PitchAs a chanter reed is played, it will absorb moisture. This moisture will soften the cane, which normally would lower the pitch, however there's a second effect on the reed. When played, a reed experiences air pressure upon it, forcing it to close up, which raises pitch. (This is evidenced by the fact that a reed will rise in pitch on a bellows-driven set of pipes, which is absent of any moisture change and also by the fact that if you overblow a reed it will close completely and shut down.) This means that if a piper picks up a set of bagpipes and tunes the drones to a relatively dry/unused chanter reed, the drones will be out of tune after a brief time (5-15 minutes usually) as the chanter reed pitch rises.One might think that it would be advantageous to keep the reed very moist—eliminate one variable, so to speak—perhaps by leaving the chanter attached to the bagpipe bag. However, moisture is a catalyst for mold growth. Mold breaks down a reed and will greatly reduce its life span. Consequently, most pipers remove their chanters from the bag and use a "reed cap" (sometimes called a "chanter cap" or "dry stock") to protect the reed while it is seated in the chanter. On the other hand, if your reed is still developing mold while in the reed cap, more air circulation would be wise. Drill a few holes in your reed cap—more easily done with a home-made PVC model. Later if your reed is drying out, some or all of these holes can be sealed with tape. In some extreme cases of constant high humidity (such as the tropics), you may find that even air circulation is not enough and reeds have to intentionally dried with exposure to gentle heat—but be aware that this is not necessary for the vast majority of climates. Or, if you live in a very dry climate (desert region) or at high altitude (mountains), you may opt to keep your chanter in your bag as you may want to keep as much moisture on your reed as possible. If you do regularly leave your chanter in its stock, it's a good idea to periodically remove it to make sure it isn't swelling and running the risk of getting stuck in the stock. (It has happened!) Some pipers find that a chanter reed cap with a built-in moisture stabilization system (such as the Piper's Pal), will keep their chanter reed "just right" and ready to go. A reed maker that I know swears that it's the cycle of drying out then rehydrating that shortens a reed's lifespan. I have no good reason to dispute that. A specialized cap should help keep a reed's moisture content more stable. Some pipers say that such a cap makes little noticeable difference to them. As with most things with piping, there are claims either way.
Tip for Reed Caps: When you put on your reed cap, pick a reference point and always tighten the bolt in that same location—for instance, above the High-G hole. If you don't, you will gradually compress a ring in the hemp that holds your chanter into its bag stock, resulting in a loose chanter. The Reed/Chanter RelationshipIn short: "In/up, out/down." Lowering the chanter reed into the chanter shortens the distance between it and the holes in the chanter and raises the pitch. Raising the reed lowers the pitch. Changing the quantity and position of the hemp on the binding will affect where the reed seats. (If a chanter has a consistent problem with the reed seating too high the reed seat can be reamed out a bit; a task not to be taken lightly.) If the bottom of the staple is in direct contact with the reed seat—with no hemp acting as a cushion—the pitch of the reed will be raised even more than you may expect. Whatever you do, you want the reed seated very firmly as a loose reed will be flat and irratic. Some pipers opt to tap (create threads in) the read seat in the chanter which allows the reed to rise or sink by merely twisting the reed to the right or the left.The top hand notes' pitches are more greatly affected by raising or lowering the reed. This means that if the lower notes are in tune and the top hand is flat, it may very well be corrected by pushing the reed slightly deeper into the chanter. This also means that the scale is stretched as the reed is seated deeper. How to Set-up a New Reed in a Chanter for Solo Performance: Now, before you start the following process, you'll want to make sure that your pipes are adequately warmed up (typically, 10-15 minutes) and you are "blowing steady". If your drones are wavering due to uneven blowing pressure, you'll be trying to tune your chanter to a moving target which will be very difficult. (If you are not sure if you are blowing steady, record yourself and listen—it'll be pretty obvious.)
Modifying ReedsWhy would someone alter a chanter reed? Maybe it requires the wrong pressure or it doesn't sound right. Almost all manipulations are made on new reeds. For my page on scraping, sanding, pinching, etc. visit Modifying Chanter Reeds.Reed DeathSo how to you know if a reed is dying? It will tell you. A "blown out" reed will begin to behave erratically: notes will be right one moment and way off the next, a G gracenote might honk before correcting. To quote the movie Ghostbusters: "Cats and dogs living together—mass hysteria!" It may be hardly noticeable at first. A note that acts weird every few days or simply after playing a long time. Gradually it just gets worse until you decide to replace it.If you have comments or suggestions, please contact me. This page last updated Tuesday, February 7, 2012. |
| sitemap | ||

